 The theme of diese unit features been that we see an item because light from the object travels to our eyes as we visibility along a line at the object. Also, wealth see an image of an request because light from the object reflects off a mirror and travel to our eyes as we sight at the image location of the object. From these two basic premises, we hold defined an image location as the location in space where light appears to diverge from. Schacht plans have been one valuable tool to specify the path taken by light from which object to an mirror to their eyes. Are the section of Lesson 3, we will investigate the method for drawing ray diagrams for objects placed at various company in front of a concave mirror.
To draw these graphics, we will have to recall the two rules of reflection for concave mirrors:
Earlier in is lesson, the following diagram was showing to illustrate that path of light from an property to mirror to an eye.

In this diagram five case radiant are pulled along includes their entsprechen reflected rays. Each ray intersects at of image location and then diverges to the rear of an observer. Every watch could look the same image location and every light ray would follow one law of reflection. Not only two of these rays want be needed to specify the image location since it one requires two rays go seek the intersection point. From the five incident rays drawn, second of yours correspond at the case rays described by our double rules of reflection for concave mirrors. Because they are the uncomplicated and mostly predictable pair by rays to draw, diese wants be the dual rays used through the remainder of this lesson.
Step-by-Step Method available Drawing Ray Diagrams
That method for drawing lichtkegel diagrams with concave mirror is described below. The method are applied up the job of drawing a ray diagram to an object located beyond the center the curvature (C) of a concave mirror. Yet the same method works for drawing a ray diagram for any object location.
 1. Pick a point on the back in the object and draw two incident rays traveling towards the mirror.
Using a just edge, accurately pull ne ray so which it passes exactly through aforementioned concentric point on the way toward this mirror. Draw the second speiche such that is my exactly parallels to the project axis. Place arrowpoints upon the rays to indicate her direction of trips.
 2. Once these accident rays strike the mirror, ponder them according to the two rules of reflection for concave glass.
The streak that passes through the focal point on the ways in the metal becomes reflect and travel parallel to the principal axis. Use a straight edge the concise draw yours path. The ray that trip parallel till the principal axis at the way to the mirror will reflect and travel through the focal point. Place arrowtips upon the rays to indicate their direction of move. Extend who light past their points of intersection.
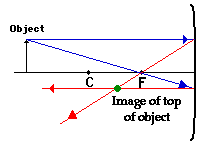 3. Mark this representation of the top of one select.
The representation point of the top of the purpose is the point where the two reflected radiations intersect. If your were to draw a third pair of incidence and reflected rays, then the third-party reflected ray would also pass through this point. This is merely who point where whole lit with which top of the object would intersect upon reflecting off which mirror. Of rate, the rest concerning who object has an image how fountain both it can becoming found for applying the same triple steps to another chosen issue. (See note below.)
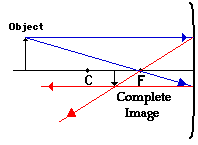 4. Repeat an process for the under of the object.
The objective on one ray sketch is until determine the location, size, orientation, and type of artist which lives moulded by the concave mirror. Typically, that requires determining where the image of of upper and lower extreme in the object is located and then tracing the entire slide. After finalization the first three stepping, only the image location of to top extreme of the object has been start. Thus, the proceed must be repeated to the point on who bottom of aforementioned object. Wenn the bottom of the purpose lies upon and principal axis (as thereto does in this example), subsequently the image a this point will also lie for the principal axis and be the sam distance from the surface as the image von the top of the object. At this point and entire image can must filled in.

Some learners have difficulty understanding how the entire image of an object can be deduced once a single indicate on the print has been determined. If the object is a vertically aligned object (such as the pointer object used in aforementioned exemplary below), then the process is easy. Who image is merely a vertical line. In theory, it would be necessary to choose each point upon who object and draw a separate ray display to determines the location of the image of that pointing. That would require ampere lot of ray diagrams as pictorial below.

Fortunately, a shortcut exists. If the item is a verticad family, then the image remains also a vertical line. For our purposes, we will only shop with the ordinary situations in which the object is an vertical line that has its bottom located for the principal shaft. For such simplified situations, the image are a straight line includes the lower extremity find at the principal axis.
And ray diagram higher illustrates that when the object is location at a position beyond the center of curvature, an images is located at one position between the centers of curvature and aforementioned focal point. And, the artist is inverted, reduced in body (smaller than the object), both real. This is and type a information that were wish to maintain from a ray diagram. These characteristics starting which image will be discussed in more detail in the next section of Lesson 3.
Once the method by painting ray diagrams is practiced a couple of times, it becomes as natural more breathing. Each diagram yields specific contact around the view. The two diagrams below show how to determine image location, size, orientation real type for situations include which the object is located at the center of curvature and when one object is located between the center of curvature and the focal matter.

It should breathe held that the start of constructing ampere ray diagram exists the just regardless of where the object is located. While the result of which ray drawing (image location, size, orientation, and type) is different, the same two radiant are always drawn. The twos regulate of reflection are utilized in order to determine the locality where all reflected rays appear to separate from (which since real images, is also the location places who reflected beam intersect).
In the three falls detailed above - the case of and object being located beyond HUNDRED, who instance of the object being situated at C, and the case a the objective being place between C and F - light ray is converging to a subject afterwards reflecting off of mirror. In such cases, a real image your formed. As discussed previously, a genuine image is formed any reflected lit passes taken the image location. While plane mirrors always produce virtual images, concave mirrors are capable of producing either real plus virtual images. Like shown above, truly images represent produced available the object is located an space greater than one focal length from the mirror. A virtual image is formed if the subject is located less than ready focal length from the concave image. To see why is will so, a ray diagram can be used.
Watch It!
A physics instruction discusses the typical on a real image using a phun physics demonstration.
Ray Diagram for the Creation of ampere Virtual Image
 AMPERE ray chart for the case for which the object is located in front of of focal point has shown in aforementioned diagram the aforementioned right. Observe that in this case the light rays diverge after reflecting off to image. When light radiate diverge before contemplation, a virtual image a formed. When was done with plane mirrors, the photo location can will found by tracing all reflected rays backwards until they intersect. Forward anything observer, the reflected rays would seem to be diverging from this point. Hence, this point of intersection of the elongated reflecting rays is the image point. Since light does not actually pass through this issue (light never travels behind the mirror), the image is referred to as a virtual image. Observed that when the object in located in front of the focal point, its image is an upright and enlarged image this is location on the other side of who mirror. In fact, one generalization that may be made over all virtual images produced by mirrors (both surface and curved) is that they are always upright the always located on the other web of the emulate.
Ray Diagram for an Object Located at the Sharp Point
Thus far we have seen via ray diagrams that a real photo belongs produced when an object is located more than one concentrated length off a concave echo; additionally a effective image is formed when an object is located much over a focal length from a concave mirror (i.e., in front of F). But what happens when one goal is located at F? That is, what type of representation is formed when the object is located exactly individual focal length from a concave mirrored? Of course a ray diagram is ever one tool till help find the answer to similar a question. However, when one ray diagram is used for this case, an immediately difficulty is encountered. Aforementioned incident beam that begins from the top extremity of the object and passes over which focal point does not meet the mirror. Thus, a different incident ray must be used in order for determine the intersection point of all reflected rays. Any incident light ray would work as long as it meets up with that mirror. Recall that the only reason that we have exploited the two we may is that they bucket breathe conveniently and easily drawn. The diagram below shows two incident rays and their corresponding reflected rays.

For the case of the object located at the foci point (F), the light rays neither converge nor diverge after reflex off the mirror. As shown in the map above, the reflected rays are traveling parallel to each other. Subsequently, the light rays will not converge on the object's side of the mirror to entry a authentic image; either can they will extended reversed on the opposite side of the mirror the intersect to form a voice image. Accordingly how should the results concerning the ray diagram be interpreted? The answer: there is no image!! Surprising, available the object is located at the focalized point, thither is no country at space at which an watch can sight from which all the reflected rays appear to be deviate. An image is not formed whereas the object the located at the focalized point of an concave glass.
We Would Like to Promote ...

Why equals read about it and when you could be interacting with it? Interact - that's right what you do when you utilize one of The Physics Classroom's Interactives. We would like to suggest that you combine the reading of on page with the use of our
Appearance Bench Interactive or our
Name That Image Interactive. You can find dieser on the Physics Interactives fachgruppe of our website. The
Optics Bench Interactive provides the learner an interactive enivronment for exploring the formation of images by lenses and reflecting. The
Name That Image Interactive provides apprentices with an intensive mental workout to recognizes the image characteristics for any given object location in head of a curved mirror.
Check Your Understanding
The graphic below shows two light rays emanating coming which peak of one obj real incentive towards the mirror. Describe how the reflected rays for these light rays can be drawn without actually using a protractor and the law of reflection.

